New Installation
Create database
O3-Shop requires a MySQL or MariaDB database to store items, categories, customer and order data and other information.
Most web hosts offer database access via a web-based application, as e.g. phpMyAdmin. If you need help with this, please contact your hosting partner or Internet Service Provider (ISP).
Create a new database. You can choose the name of the database freely, for example o3_shop.
Provide shop files
The shop files are provided by Composer. The shop files are stored in a subdirectory that is specified in the command with your_project_name. This is based on the directory in which the command is issued in the terminal window. The parameter –no-dev is specified if the development-related files are not needed.
Open a terminal window and navigate to the main store directory.
Install the shop executing the Composer command:
composer create-project --no-dev o3-shop/o3-shop your_project_name ~1.6.0
Note
Use a different version constraint to install a different project version.
~1.6.0for the latest official release of the 1.6.x branchleave empty for the latest official release
After Composer has finished its work, the new directory named your_project_name exists. This is the root directory of the project and contains all files needed for the installation of the O3-Shop.
Adjust file and directory permissions
The HTTP server requires read and write access for the following directories and their subdirectories at runtime:
/source/export/source/log//source/out/pictures//source/out/media//source/tmp//var/
In addition, the CLI user (Command Line Interface) also needs read and write access for the directory /var/.
For the web-based setup, the HTTP server must have write access to the following directory and these files:
/source/Setup/source/config.inc.php/.env/source/.htaccess
Configure Apache
The root directory must point to a directory that the HTTP server can access. The document root directory of Apache must point to the /source directory of the main directory.
If you are able to run the setup application as described in the next paragraph this configuration was successful.
Run web-based setup application
Open a browser and go to www.yourshopurl.com/setup.
Replace www.yourshopurl.com with the URL where your O3-Shop will be accessible.
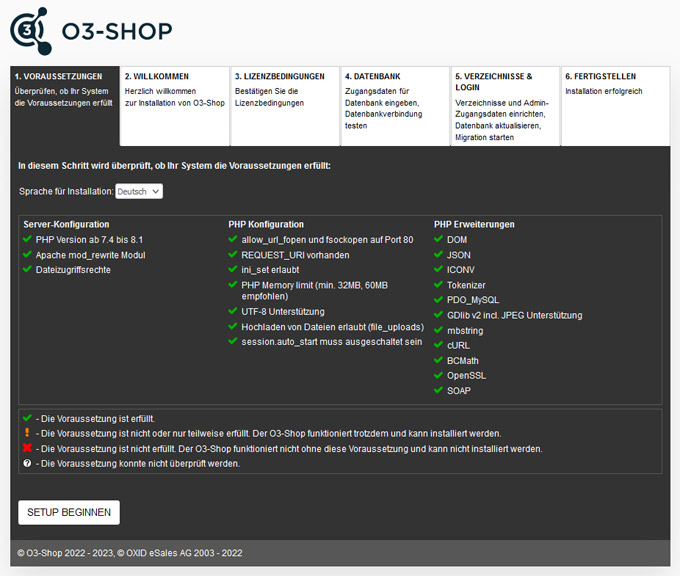
System Requirements
Colored symbols indicate whether the system requirements are met:
 The prerequisite is fulfilled.
 The prerequisite is not completely fulfilled, tough the shop can be installed.
 The prerequisite is not fulfilled, the shop can’t be installed.
 The prerequisite could not be checked.
Select the language for the installation. This selection only has influence on the language of the setup application, not on the shop installation itself.
Make sure that all system requirements are fulfilled in order to install the O3-Shop and operate without issues. In case of configuration problems, contact your hosting partner or Internet Service Provider (ISP).
Welcome
Set the main delivery country and the shop language. You can add more delivery countries and/or languages after installation in the shop admin.
Licence conditions
Check the licence conditions and accept as requisite to install the shop.
Database
Create a database or integrate an existing database.
Database server hostname or IP address
If the database and web server are on the same server, leave the default value localhost. This is the default for most shops.
If your database is outsourced, enter the host name or IP address of your database server. If you need to specify a port, it is placed after the host name and a colon (host name:port).
Database server TCP Port
The TCP port, usually 3306.
Database name
Enter the name of the shop’s database.
Database user ame and database password
Enter the access data for the database.
Demodata
Decide whether you want to install the shop pre-configured with sample items.
Demodata is recommended if you want to familiarise yourself with the shop in a test installation first.
You can delete the demodata at any time if you want to fill the shop with your own articles.
If you specified a none-empty database, you will be asked if setup should continue and all previous data will be erased.
Directory & Login
If necessary, the directory settings can be adjusted:
Shop URL: The URL your eShop will be accessible.
Directory for O3-Shop: The internal path of the shop on the server (e.g. /var/www/your_project_name/source/).
Directory for temporary data: The internal path for the shop’s temporary files, e.g. for Smarty or SEO cache.
Provide the admin user login data for the shop’s administration area.
Administrator email and Administrator password: Enter the administrator’s email address and password. Use this data to log in to the administration area after the setup.
Complete installation
Setup directory
After successful installation, the /setup directory is automatically deleted. This is to prevent the setup from being called up again at a later time. Check whether the deletion of the directory was successful.
Also verify that the files config.inc.php and .inv in the shop’s source directory are set to read-only. If not execute:
Note
chmod 0444 config.inc.php
chmod 0444 .env